

Version: 7.1.2.2
Updated 11 February 2013
What is a Training Matrix?
The main purpose of a Training Matrix is to plan the alignment of employee skills against the skill / role requirement and then track their Training Plan in order to achieve full competency.
It provides written proof that courses have been completed and can be used for a review process, e.g. annual reports, justification for promotion, etc.
This Training Matrix allows you to enter data such as positions within the company, categories of skills and units of competency, grades attained and required and even how important it is for the employee to complete a certain course and by when.
You can group people into teams or assign roles, and even specify any training need options, such as vegetarian meals, during training.
There is an additional function to allow you to expand on the information you wish to have for training purposes and have that recorded in the Training Matrix as well.
Uploading Data into the Training Matrix
Explanation
The Training Matrix module is integrated into your TMS but you need to provide data to populate it. There are two options to do this:
- Using the CSV files you can enter your own data
- Complete a TMX Template workbook and Bluegem will import it for you (fee involved)
Using CSV Files
Once you have completed the CSV Files go to: where do you do this??
Admin Training Matrix Manage Templates
- Browse and upload your CSV File
- Add Lookup Values Via CSV
Figure 1 Manage Templates
File Names
Explanation
The table are the definitions of the fields that need to be completed in the CSV files or the wordbook. There are examples of each field in the CSV and wordbook files to help you complete them. Refer Figure 2
|
CSV FILE |
Description |
|
TMConfigPositions |
A list of position names in the company, e.g. supervisor. One or more training templates can be created for each job position or title. |
|
TMConfigAreas |
A list of areas or categories under which competencies can be grouped e.g. an area called 'Computer Skills' can cover competencies such as : MS Word, Excel, SAP, Data Entry, etc. |
|
TMConfigUnits |
The UOC the employee is expected to achieve. UOC are categorised under Areas of competency. |
|
TMConfigGrades |
These are the levels of competency that employee can achieve e.g. Advanced, Intermediate, Basic. Grade level may depend on the trainee's role. |
|
TMConfigPriorities |
This is used to determine how important a competency is to a person's position or job title. |
|
TMConfigPayLevels |
If applicable. Can track level of training & skills required at a certain pay level. |
|
TMConfigTeams |
Allows you to group people into teams by role, position, location, etc. |
|
TMConfigRoles |
Allows you to specify one or more roles for each employee independently of their position or job title. |
|
TMConfigTnos |
Training Need Options (TNOs) allow you to specify any training requirements that relate to the individual employee e.g. Vegetarian meals during training. |
|
TMConfigExtensions |
Allows you to specify a set of fields and field types to expand on the information that can be captured for any employee. This table has 3 columns: Name of Data Field, Type of Data to be stored, and whether the field is mandatory or optional. TRUE = Mandatory. |
Figure 2 Table of Fields
What is a Template?
Explanation
A Template in the Training Matrix is a collection of categorized skills or competencies that relate to a position or job title. Because people who have the same job title may often need slightly different skills it is possible to have multiple templates for each position. The template has a Template name, a Position name, a list of Areas of Competency, and a list of Units of Competency under each Area. Template creation can only start once the configuration files have been uploaded.
Creating a Template
Navigation
Training Matrix Manage Templates
-
Click
Add New Template
Refer Figure 3 -
A new screen will open Refer Figure 4
Figure 3 Add New Template
Figure 4 Upload CSV file
-
Name the Template
-
Select a Position from the drop down list (this comes from the TMConfigPosition file you uploaded earlier).
-
Or click
to Add a new Position. -
Click
Next to continue. -
Select the Areas of competency which will be used to categorize the required skills.
-
The available categories are in the left pane.
-
Hold down control key to select multiple relevant areas
-
Click the >> button to transfer them to the right pane.
-
Any item can be removed by selecting it in the right pane
-
Clicking the << button.
-
Click
Next to continue.
Figure 5 Assign areas of competency
-
Select each area in turn using the select drop down list
-
and for each Area select one or multiple Units of Competency by holding down the control key
-
Select from the list in the left pane.
-
Then click the >> to add them to the right pane.
-
To remove items from the right pane, select each one and click the << button.
-
Click
Next when all units of competency have been selected for all areas.
Figure 6 Units of competency
- This now gives you Templates which you can allocate to employees.
Using a Template
Explanation
Templates can now be applied to multiple employees who have that job role. However, despite being in the same position or job title each employee may require slightly different levels of skill depending on the specifics of their job. It is also highly unlikely that you will be able to send them all on the same courses at the same time. The individual Training Plan inherits the basic skill sets from the Template but allows you to individualize the required skill levels and scheduling of training.
Staff Training Profiles
Navigation
Admin Training Matrix Staff Training Profiles
Figure 7 Training Profiles
-
You are able to View and Edit individual profiles.
-
You are also able to filter according to name and email address,
-
Which Training Plan Template, Position, or Team they have been allocated.
-
Profiles show additional information that you decide is important to store about your employees e.g. their position and pay level, if they belong to a particular group or team and any training need options (TNOs) e.g. vegetarian, dyslexic.
NOTE:
You must edit an individual profile before you can add a Training Plan. This will ensure they are allocated a Position and then you can select the appropriate template to that position.
The Training Plan allows you to determine what training they will receive and when, view training received and competency levels, and overdue dates.
If the student does not yet have a training plan the icon will show a small button to allow you to create one. Also the Training Plan template column will be blank and there will be nothing in the Delete Plan column for these students.
Creating a New Training Plan
- To create a new training plan click the icon with the small button for the student.
- If there are no drop down options available to select
- To Edit Profile to assign employee the correct position, pay level, etc. before continuing to create the Training Plan.
Figure 8 Training Plan Template
- Selecting a position will display the available templates for that position.
- Select the desired template and click
Next. Refer Figure 8
- If the template desired is not available, create a new template.
Customising Training Plans
Explanation
The initial Training Plan includes all the Units inherited from the template grouped under their respective Areas.
-
At the top is a summary of training progress to-date which is initially blank.
-
The Training Plan must first be customized for the student by selecting the anticipated levels of competency required, the priority, and the expected achievement date for each unit of competency.
-
The units colour coding for the Training Plan
-
GREY – not yet set
-
RED – set but not yet achieved by student
-
GREEN – set and achieved.
-
Figure 9 Training Plan before customisation
-
To customize the template for each competency
-
Click the Edit at the right of each unit in the table.
-
There are two phases to this process
-
The planning phase indicated in red outlines
-
The tracking or progress-reporting phase indicated in green outlines.
-
-
The planning phase tells you what the student is expected to achieve by when.
-
The progress-reporting phase tells you what the student has achieved when.
-
This needs to be completed for each unit in the training plan.
Figure 10 Customise Training Plan
-
After completing both the planning and tracking phases of the plan there will be a summary above the grid stating how much of the training has been completed, how many units are outstanding and the priority to get things done.
-
Green items - are those that were achieved at the levels and within the timeframes expected.
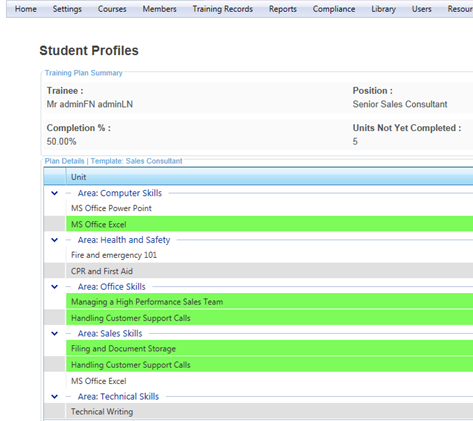
Figure 11 Completed unit
-
Red items
- the student did not achieve the level required, the date achieved was later than the planned date, or both.
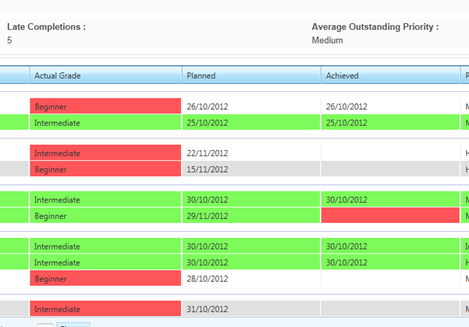
Figure 12 Outstanding units
-
The Edit Unit icon at the end of each unit allows you to edit any training requirements.
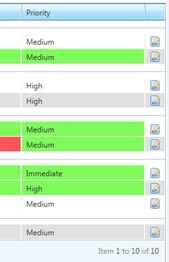
Figure 13 Edit Training Plan