There are many situations where it makes sense to offer your audience a suite of web-friendly documents that are easy to create, publish and edit. Wouldn't it be great if you could continue using the tool that is familiar to both you and your audience, e.g. MS Word? Let's say you wanted to distribute a set of user manuals, or how-to guides for your product or service. It would be great if you could simply use your most productive document editor and just have an easy way of making those docs available to your clients without having to become an advanced web developer, or having to pay top-dollar to employ one?
Although it's still a well-guarded secret today, Microsoft have given you exactly this functionality for a very long time, since Office 2007 to be exact. It's called the "Blog Post". You'll see it as a document template whenever you attempt to create a new document. Admittedly, the functionality has improved dramatically since its first release in 2007, so back then it may not have been that useful to you. But now it is!
Note: This document is about how to use MS Blog Posts to distribute your documents effectively online. BUT if you already have SharePoint, Office 365, OneDrive for Business or even a free OneDrive Personal account you can already publish any MS Office or PDF Document, providing an even easier distribution path for your audience. The combination of Google Drive and Blogger offers similar functionality in the Google environment, and since Google Docs is intuitive and quite similar to MS Word, you would not require a steep learning curve.
There are 4 steps to create and publish a blog post:
- Subscribe to a Blog site, like WordPress, TypePad, SharePoint, Telligent Community, and many others.
- Create your document in MS Word using the Blog Post Template
- Register your Blog Site with MS Word
- Publish you Blog
- Inform your audience
Step 1 - Subscribe to a Blog Post
In fact, you can use almost any blog site for this purpose. But you will experience varying levels of integration and compatibility, particularly with styles and images. The listed sites [1] will let you publish your MS word blog with images and styles intact with little or no additional effort required. Steps 1 and 3 may seem daunting at first, but remember these are one-off activities. Once set up you can become a create-and-publish machine with just a single click.
To subscribe to a Blog Site just go to any of the linked URLs in [1] and complete the online registration form. In the case of WordPress you have the option to create and host an entire corporate website if you wanted to, but if your purpose is just to create a blog site to provide product & service information to your audience then consider the Get Started option on WordPress: https://wordpress.com/learn-more/?v=blog

Figure 1
The Grid option places a clickable snippet from each of your latest blog posts in a cell of a Grid or Tabular View, while the List view generally presents somewhat more information from each blog post in a scrollable list. The blog site will be created with your chosen domain. Copy the blog url. You'll need it for step 3 and choose a subscription level that suits your business model and budget:
Step 2 - Create your document as a new Blog Post
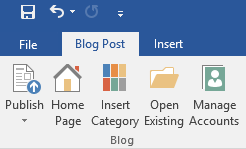
This step requires the least explanation as it basically means creating a word document. A few functions are not relevant to a blog format and therefore not available in the Blog Post template. But there are some additional functions in the ribbon control that are specific to the Blog format. These are grouped at top-left of the ribbon controlled as shown below.

Figure 2
- Publish – use this icon once you've completed you blog and ready to publish it to the blog site.
- Home Page – visit the home page of you blog site
- Insert Category – Select a predefined category from your blog site and associate your blog with it
- Open existing – Open an existing Blog Post for editing or republishing
- Manage Accounts – this is where you enter your blog site details and login credentials
Step 3 - Register your Blog Site

Figure 3
This is possibly the trickiest part, but only needs to be done once.
- Click Manage Accounts in figure 3
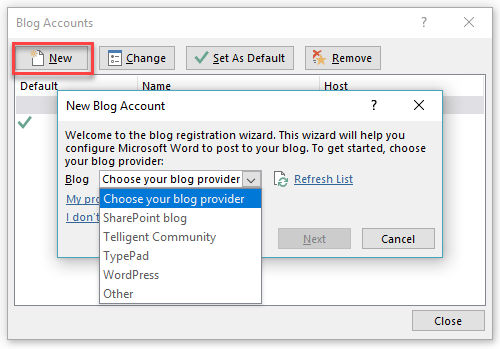
- Click New in figure 4
- Select you blog provider from the Blog drop down list, e.g. WordPress.
- Get the url of your blog site, e.g. https://mySite.wordpress.com and enter it in the blog post url text field, closed within angle brackets <enter your blog post url here>
- Enter your blogsite login credentials
- You can save time by clicking remember password (optional)
- Set picture options, for WordPress, the default 'upload pictures to my blog provider' is best.
- Save.
- If you have multiple blog providers, you can set the default
Step 4 – Publish Your Blog
From now on every time you create a new blog post with the template, you'll be able to create your MS Word doc and just click Publish. Using the Publish Drop down arrow, you could also select publish as DRAFT if you intend to keep working on it and don't want it to be visible.
Options: When you create a new blog, you can change the default account and category by selecting your options for the respective drop down lists.
Hint: Categorising your blogs is a great way to make it easy for your users to find them. Categories are also hierarchical, i.e. they can be divided into infinite levels of sub categories. This is a great way to build an index list like a table of contents.
Step 5 – Inform Your Audience
Now that you blog has a url site with valid content which you have published (not as draft). You can now use MS Word Mail Merge and a predefined form letter to update your audience. Your form letter would include a link to the blog site home page where they can prowse all blogs, or to a specific post or category that you want to draw attention to.
Advantages: This structure is maintainable, searchable on the web, improves your SEO and brand as a content expert and its just as easy to maintain as a folder on your desktop.
Limitations: One important imitation is that your table of contents does not automatically convert to bookmarks and anchors that can be used on the wen is the same way you use them in MS Word. This has to be done manually but hyperlinks to book marks does work. Just means you have to create your TOC manually.
Author:
 |
Bruno Cozzi is the managing director of Bluegem Software. He has many years' experience in software, database and computer technologies. As a technologist in Bluegem he and his company, together provide software products, engineering solutions, advice and support for training and education providers seeking better ways to manage and streamline student and learning management activities. |
